Table of Contents
Packet routing in networks is handled via route tables be it physical networks or cloud-based networks. Route tables are an important component of network communication as they hold the rules and mechanism on the basis of which packets will be routed in a network. In cloud networks route tables perform the same function but packet routing happens in virtual networks. Route tables maintain IP address, virtual network gateway information for packet routing.
Today we look and see how to configure Azure Route tables (UDR) in Azure portal and ARM.
Related: What is Azure Route Server? How does it work?
What are Azure Route Tables or User Defined Routes (UDR)
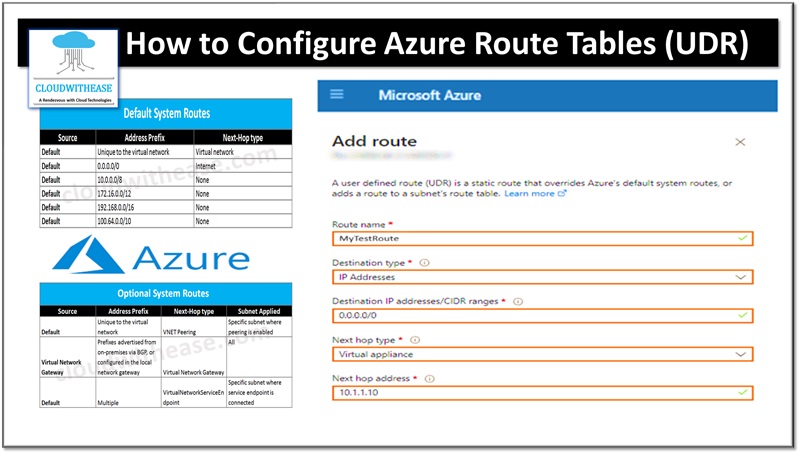
Azure route tables or user Defined routing (UDR) let you create network routes which CloudGen Firewall VM can handle traffic between your subnets and Internet. To receive or forward traffic, IP forwarding must be enabled on network interfaces. When different route types are there in the UDR table, UDR routes take precedence over default system routes. When several routes match the destination, a more specific route is to be used. The default system route is present in Azure route table always to allow the following:
- Enable traffic movement within the virtual network
- Enable traffic movement to Internet
- Traffic movement between virtual networks using Azure VPN gateway
- Traffic from virtual network to networks which are connected using Azure VPN gateway
Limitation
In one subset multiple network interfaces are not supported for standalone firewall VM.
How to configure Azure Route Tables (UDR)
Steps to Create Route Table
To create a route table in Azure portal, follow below steps:
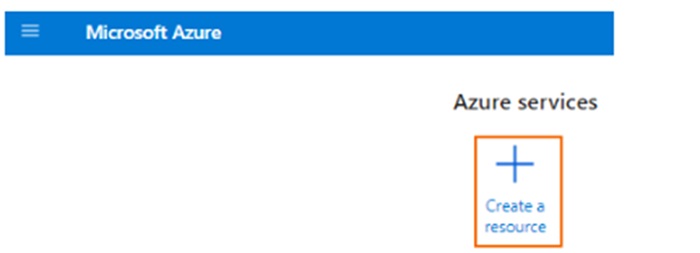
Step 1: login to Azure portal : https://portal.azure.com
Step 2: Click plus (+) to create route
Step 3: Enter ‘route table’ in search and press Enter
Step 4: Select Route table
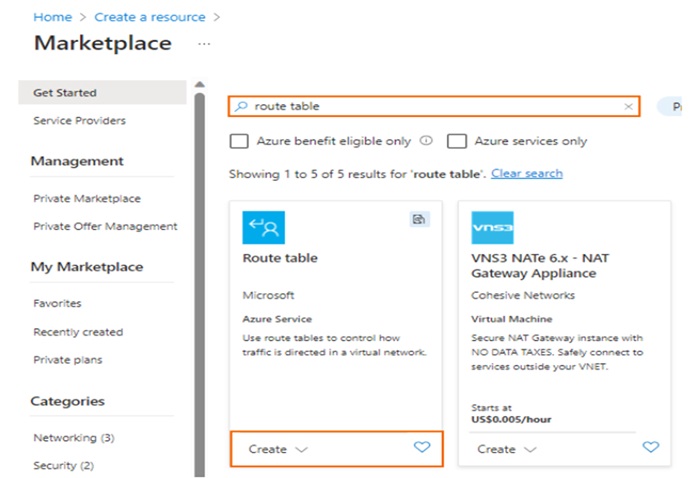
Step 5: Click on Create
Step 6: In Route table mention below settings
- Subscription – Choose Azure subscription
- Resource group – Choose an existing resource group or click to create new resource group (unique name)
- Region – Choose Azure data center where VM is to be deployed. The route table must be in same location as VMs and virtual network
- Name – Provide route table name

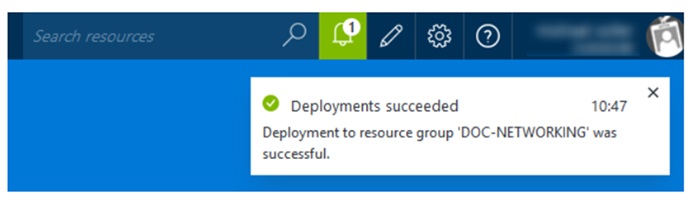
Step 7: Click Review + Create
Step 8: Review settings and click on create
Steps to Add Routes
Next steps are now to ‘Add routes’
To use a firewall VM as gateway create user defined routes (UDR).
If traffic needs to pass through a firewall VM between two subnets then a route needs to be created for each subnet using firewall VM gateway.
Step 1: Login to Azure portal : https://portal.azure.com
Step 2: Open route table create earlier
Step 3: In settings tab click routes
Step 4: In routes window click + Add
Step 5: In Add route column put
- Route name – Unique route name
- Destination Type – Choose IP address . enter destination IP range in CIDR. Default route is 0.0.0.0/0
- Next Hop Type – Choose virtual appliance
- Next Hop Address – Provide private IP address in firewall VM
Related: Azure Routing Table: Azure Route & Next-Hop Types
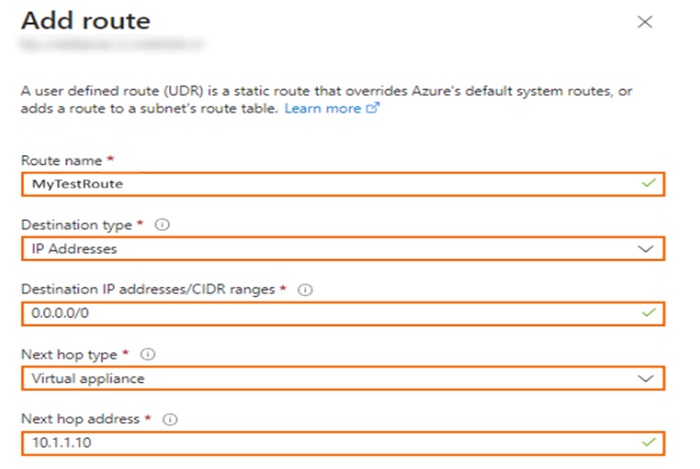
Step 6: Click Add
Steps to Associate Route Table to Subnets
Next step is to associate route table to subnets
Step 1: Login to Azure portal : https://portal.azure.com
Step 2: Open route table
Step 3: In Settings click subnets
Step 4: In subnets click + associate

Step 5: In Associate subnet expand virtual network and chose virtual network
Step 6: Expand subnet and choose
Step 7: Click OK
Enable IP Forwarding
Next step is to enable IP forwarding for network interface of VM firewall
Step 1: Login to Azure portal : https://portal.azure.com
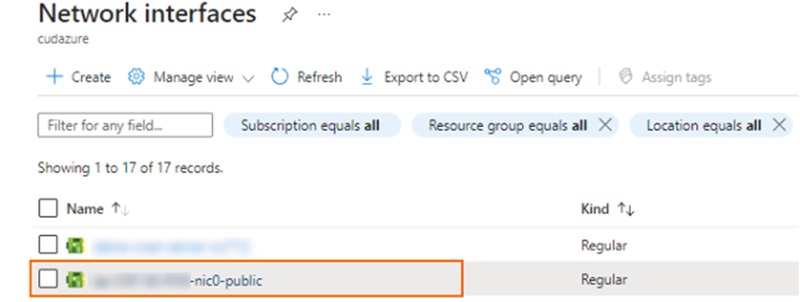
Step 2: Open network interface associated with firewall VM
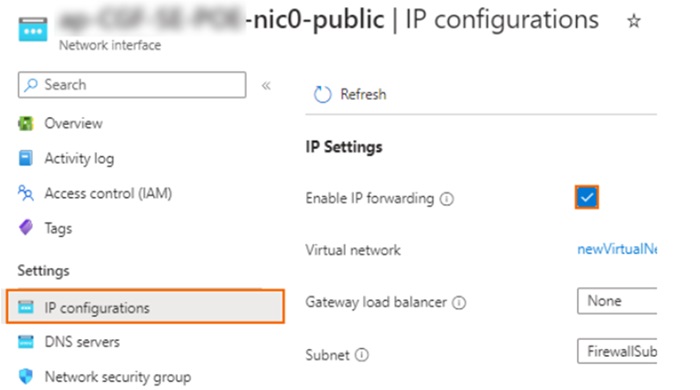
Step 3: In settings click IP configurations
Step 4: Choose box ‘enable IP Forwarding’
Step 5: Click apply to apply settings
Now CloudGen firewall VM can forward traffic to the Internet from backend VMs.