Table of Contents
AWS Load Balancer automatically distributes incoming application traffic across multiple targets (like EC2 instances) to ensure high availability and fault tolerance.
Load balancers are crucial components in traditional and cloud computing both. But since the majority of enterprises are moving to cloud nowadays they become more crucial for enterprises. They lead to optimization of cloud business application performance, improves its reliability, with seamless scalability and provide robust security. Cloud hosted business applications are critical to business and their round the clock availability with high performance determines how happy are your customers. Achieving the best performance, dependability and scalability for online business applications which are the lifeline of business in ever changing cloud environments.
In today’s topic we will learn AWS load balancers, how they work, their capabilities and usage.
What is an AWS Load Balancer
The AWS load balancer is critical to maximize performance, speed, availability of cloud hosted business applications on Amazon web services (AWS) cloud. It performs traffic distribution, automatically by handling incoming requests coming to servers or instances to avoid overload, single point of failure and optimal utilization of resources.
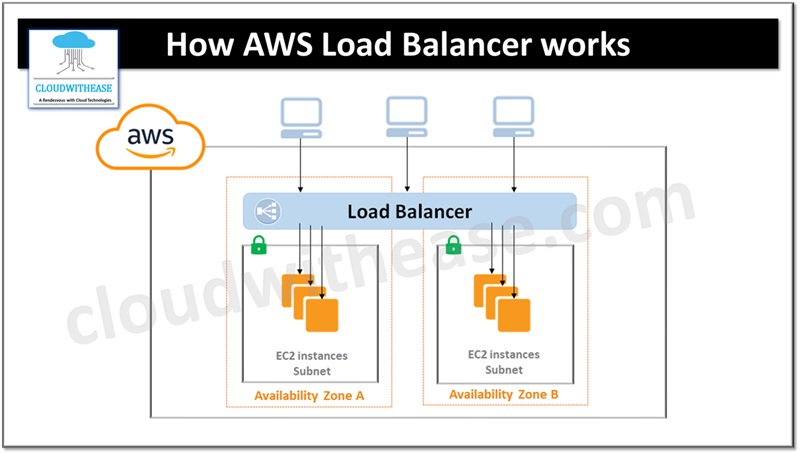
Network load balancer, application load balancer and gateway load balancer are provided by AWS. They are meant to address requirements related to improved fault tolerance, scaling of resources, improving user experience by performing load balancing in networks, applications and handling gateway traffic. Figure 1 depicts how a typical load balancer works in AWS.
How to create and configure AWS Load Balancer
I. AWS EC2 (Windows) instance creation
Step 1: To create an AWS EC2 instance login to your AWS account and go to ‘EC2 dashboard’ and click on ‘Launch instance’
Step 2: Name AWS EC2 instance as ‘Windows Instance 1’
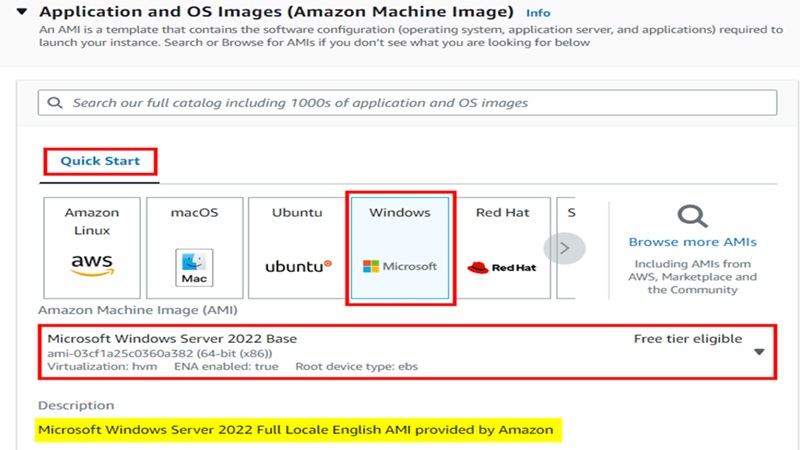
Step 3: ‘Windows server 2022’ will be base AMI
Step 4: Choose ‘t2.micro’ type
Step 5: create a new key pair or choose existing one
Step 6: On ‘networking settings’ detail page choose VPC (Default) and one of the subnets associated to ‘availability zone’ which would be preferred zone to launch instance
Step 7: Create a new security group and assign it using ‘create security group’ option. Under security group name type ‘windows instance 1’ click ‘add rule’ to open new port
Step 8: Select Source type ‘Anywhere’ and rule type ‘HTTP’
Step 9: After reviewing configuration launch the EC2 instance
II. Create AWS EC2 (Windows) instance on a Different Subnets
Step 1: Click on ‘launch instance’ button
Step 2: Give name to instance
Step 3: Choose ‘Windows server 2022’ base AMI
Step 4: Choose ‘t2.micro’ type
Step 5: Create a new key pair or choose existing one
Step 6: On ‘networking settings’ detail page choose VPC (Default) and one of the subnets associated to ‘availability zone’ which would be preferred zone to launch instance
Step 7: Click ‘Launch’ for existing ‘security group’ for instance
Step 8: See launched instance post configuration review
III. Connect to AWS EC2 (Windows) instance
Step 1: Click on ‘instance’ and ‘connect’
Step 2: Click ‘RDP client’ and click ‘get password’
Step 3: Click ‘upload private key’ and choose key pair file that was downloaded at the time of instance launched.
Step 4: After selecting key pair choose ‘decrypt’
Step 5: The password will be generated copy this password for secure storage
Step 6: You can search RDP on your system and open it
Step 7: From EC2 dashboard select ‘your instance’ and copy the IPv4 (Public) address
Step 8: Paste public IPv4 address inside RDP software and click on ‘connect’
Step 9: Enter credentials and you will be successfully connected to EC 2 instance
IV. Configure IIS server on AWS EC2 (Windows) instance
Step 1: When you are connected to EC 2 windows instance click on start button and click on server manager
Step 2: Click add ‘roles and features’
Step 3: Click ‘next’
Step 4: Select and click on ‘role based or feature based installation’
Step 5: Go with default settings click on ‘web server’
Step 6: Click on ‘Add features’
Step 7: Click ‘next’ and ‘install’
Step 8: You have successfully installed web server on 1st instance repeat same steps for second instance also
V. Create an AWS load balancer and check access to web page
Step 1: Under EC 2 dashboard in left pane click on ‘Load balancers’ and ‘create load balancer’

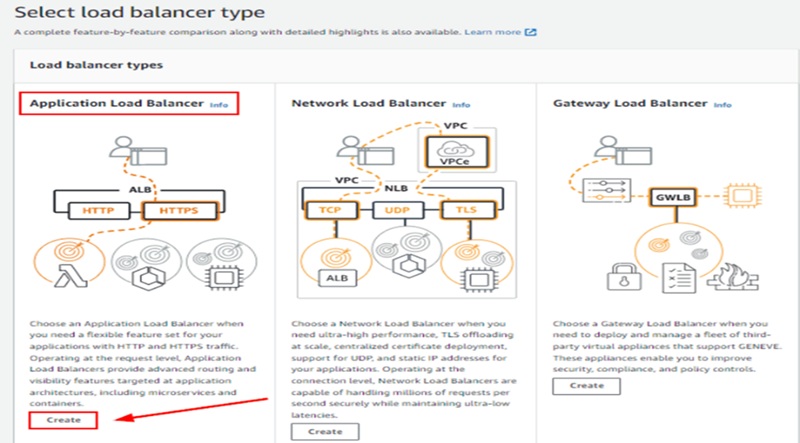
Step 2: Choose load balancer type
Step 3: Under ‘configure load balancer’
Step 4: Name your load balancer, in Scheme select ‘internet-facing’; In ip address type select ‘IPv4’
Step 5: Select all subnets in which web server is launched in ‘Availability zone’
Step 6: Under security group select ‘existing security group’ which was created during EC2 launch
Step 7: Select ‘create target group’ under ‘Listeners and routing’
Step 8: Enter ‘target group name’ and provide windows instances
Step 9: In ‘Register target’ choose instance A and B and click ‘Include as pending’ and click ‘create target group’
Step 10: Go to Load balancer and select ‘target group’ which is created now
Step 11: Click ‘Create load balancer’
Step 12: AWS will create load balancer and will take sometime to show up