Table of Contents
Large organisations that have considerable presence in the Azure Public Cloud may have their resources deployed in more than one VNET in the Public Cloud. And in such setups, there can always be a need where the resources in one VNET should have communication with resources in other VNETs. In order to enable this VNET to VNET connectivity we can use Virtual Network Peering Service from the Azure Cloud.
What is Virtual Network Peering?
Azure Virtual Network Peering allows us to seamlessly connect the VNETs together with optimal network performance. These peered VNETs can be in the same Azure region or can be a part of a different Azure region (Global VNET Peering). The traffic between the Virtual Machines of the peered VNETs traverses over the high-speed Microsoft Backbone network only, hence no traversing over the internet is required so no extra security measures like encryption are required.
Types of Azure VNET Peering
There are mainly two types of VNET peering:
- Regional VNET Peering: In this VNETs in the same region peer together.
- Global VNET Peering: In this VNETs in two different regions peer together. When creating a global peering, the peered virtual networks can exist in any Azure public cloud region or China cloud regions, but not in Government cloud region.

Benefits of Virtual Network Peering
Now, let us look at some of the benefits of VNET Peering:
- Uses Microsoft Backbone Network, hence provides ultra-low latency & high bandwidth.
- You can transfer data between the VNETs across Azure Subscriptions, Azure Regions.
- VNET peering requires no downtime to the resources during/after creation of peering.
Azure VNET Peering Considerations:
- The peered VNETs shouldn’t have overlapping address space.
- A VNET is not transitive in nature. Means if you have connectivity as per below topology:
VNET1 <-Peer-> VNET2 <-Peer-> VNET3
In the above topology VMs in VNET1 cannot communicate to VMs in VNET3 via VNET2. In order to allow this type of communication you will need to use NVAs with user defined routing to enable transit routing via VNET2.
How to create VNET Peering?
On a high level the creation of VNET peering involves the below four steps:
- Create two VNETs
- Create Virtual Machines within each VNET
- Create a Virtual Network Peering on each VNET
- Test the communication between the VMs across VNETs.
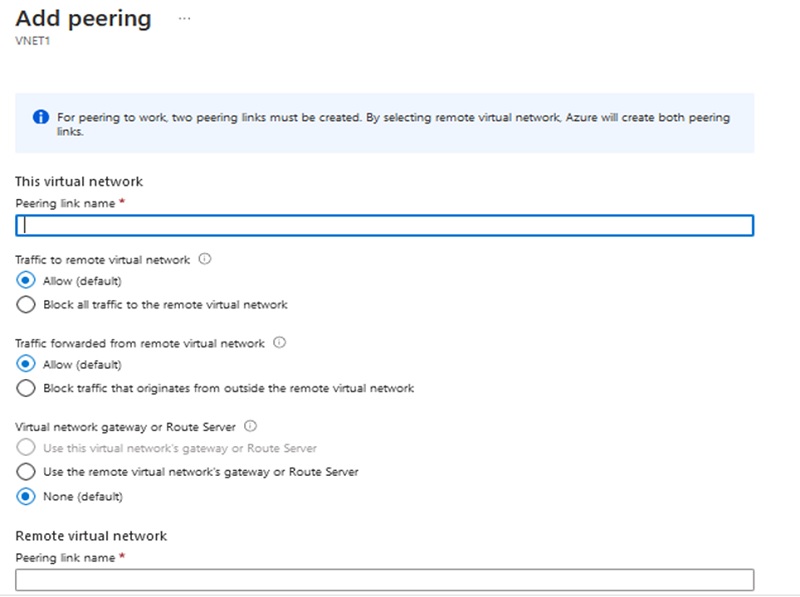
When you add a peering on one virtual network, the second virtual network configuration is automatically added.
Under the peering tab of the created VNET resource, you need to provide the inputs as below:
Gateway Transit:
The function of this feature on the VNET peers is to allow the peered VNETs to use the VPN Gateway deployed on another VNET to gain access to remote resources.
To understand, let us take an example:
- Suppose, we have VNET1 connected to an on-prem site via either a Site2Site/Point2Site VPN gateway and can access on-prem resources.
- We have another VNET2 that has VNET peering setup to VNET1 and resources in VNET2 also need to access the on-prem resources. Since, VNET2 doesn’t have a VPN gateway connection to remote site, it by default cannot access on-prem resources.
- But we can turn on a feature on the VNET Peering page of VNET2 to use a remote VNET gateway to allow this connectivity.
Key Points to Note
- Each VNET can have only one VPN gateway. If a VNET uses a remote VNET gateway it cannot have a local VNET gateway.
- Network Security Groups can be applied to allow/deny communications between the peered VNETs.
- Gateway transit is supported for both regional and global VNET Peering.